区域选择菜单
阅读
2026-02-19更新
最新编辑:Mr_Biantainne
阅读:
更新日期:2026-02-19
最新编辑:Mr_Biantainne
区域选择菜单是一个 菜单,允许玩家选择 区域 进行探索。在主系列游戏中,它出现在每 天 开始之前,并提供每个区域的信息,以便玩家可以做出最佳选择。它只显示已解锁的区域。作为 主线故事 的主要部分,区域选择菜单比大多数其他菜单要详细得多,并且它提供了对各种功能的访问,例如 生物图鉴和宝物一览,让玩家在几天之间休息一下。
皮克敏
模板:Infobox menu
在 皮克敏 中,区域选择菜单包含 PNF-404 的图片,五个气泡分别代表 区域。通过移动 ![]() / Nunchuck 上的控制摇杆 / Nintendo Switch(Joy-Con)上的左摇杆,宇宙船多露芬号 和 欧拟蛹 将在气泡之间飞行。在其中一个气泡上方按
/ Nunchuck 上的控制摇杆 / Nintendo Switch(Joy-Con)上的左摇杆,宇宙船多露芬号 和 欧拟蛹 将在气泡之间飞行。在其中一个气泡上方按 ![]() / Wii 手柄上的 A 键 / Nintendo Switch 上的 A 键,然后在消息框中确认,将选择该区域,弹出 加载画面。
/ Wii 手柄上的 A 键 / Nintendo Switch 上的 A 键,然后在消息框中确认,将选择该区域,弹出 加载画面。
菜单显示有关当前所选区域和游戏当前状态的各种信息。屏幕左上角显示区域名称。屏幕右侧会出现预览图像,以及一些代表该区域的 宇宙船零件 的星星。灰色星星表示未收集的部件,黄色星星表示已收集的部件。画面下方显示收集的零件总数,以及 皮克敏 欧拟蛹中的每种类型。在右上角,可以看到一个游戏日计数器,很像游戏内 HUD 上的计数器。在右下角,一个框告诉玩家他们可以按 ![]() / Wii 手柄上的加号键 / Nintendo Switch 上的加号键 打开 欧力马日记。玩家也可以按
/ Wii 手柄上的加号键 / Nintendo Switch 上的加号键 打开 欧力马日记。玩家也可以按 ![]() / Wii 手柄上的减号键 / Nintendo Switch 上的减号键 打开一个消息框,询问他们是想留下还是返回 标题画面。
/ Wii 手柄上的减号键 / Nintendo Switch 上的减号键 打开一个消息框,询问他们是想留下还是返回 标题画面。
Pikmin 2
模板:Infobox menu
In 皮克敏 2, the area selection menu contains an aerial view of a section of the Pikmin planet, with yellow markers on top in set locations representing areas. By moving ![]() / Nunchuck 上的控制摇杆 / Nintendo Switch(Joy-Con)上的左摇杆, the Hocotate ship (in the color it appears in-game) and the Onions will fly between the markers. Pressing
/ Nunchuck 上的控制摇杆 / Nintendo Switch(Joy-Con)上的左摇杆, the Hocotate ship (in the color it appears in-game) and the Onions will fly between the markers. Pressing ![]() / Wii 手柄上的 A 键 / Nintendo Switch 上的 A 键 while over one of the markers, and then confirming that in a message box, will select the area, bringing up the loading screen.
/ Wii 手柄上的 A 键 / Nintendo Switch 上的 A 键 while over one of the markers, and then confirming that in a message box, will select the area, bringing up the loading screen.
The top of the screen contains general information about the saved game. In the center, there is a display of the total number of Pokos the player has collected in that saved game. (Before repaying the debt, this appears as a proportion out of 10000.) On the sides, there are indicators that pressing ![]() / Wii 手柄上的方向键向左 / Nintendo Switch(Joy-Con)上的左方向键 opens the Piklopedia and pressing
/ Wii 手柄上的方向键向左 / Nintendo Switch(Joy-Con)上的左方向键 opens the Piklopedia and pressing ![]() / Wii 手柄上的方向键向右 / Nintendo Switch(Joy-Con)上的右方向键 opens the Treasure Hoard.
/ Wii 手柄上的方向键向右 / Nintendo Switch(Joy-Con)上的右方向键 opens the Treasure Hoard.
The bottom of the screen contains information about the area that is currently selected. This includes the area's name, and the number of treasures collected in the above-ground part of the area and in each of the area's caves. (Before repaying the debt, just the number of collected treasures is displayed, but after repaying the debt, the number of collected treasures and the total number of treasures are displayed.) If all treasures in a cave or above-ground area have been collected, the number will sparkle. There is also a day counter. The player can press ![]() / Wii 手柄上的加号键 / Nintendo Switch 上的加号键 to open a prompt, asking them if they wish to remain in this menu or go to the title screen.
/ Wii 手柄上的加号键 / Nintendo Switch 上的加号键 to open a prompt, asking them if they wish to remain in this menu or go to the title screen.
Pikmin 3
模板:Infobox menu In 皮克敏 3, the area selection menu takes place inside the S.S. Drake, with a 3D globe of PNF-404 on a large monitor. Areas are represented by continents on the globe, with outlines and a marker on each one. Wii U 手柄上的左摇杆 / Nunchuck 上的控制摇杆 / Nintendo Switch(Joy-Con)上的左摇杆 / Nintendo Switch(Joy-Con)上的方向键 can be used to move the cursor between areas, and pressing Wii U 手柄上的 A 键 / Wii 手柄上的 A 键 / Nintendo Switch 上的 A 键 / Nintendo Switch 上的面键右侧按键(Joy-Con 面键) will select it, bringing the cursor to a large "Land" button on the bottom right. Selecting the Land button will start the day in the selected area, bringing up the loading screen.
(There are some details to the way areas are selected. The cursor can also be moved to the Land button with the stick. In Stylus Mode, areas and buttons can also be selected by tapping them. In Pikmin 3, moving the cursor around doesn't automatically select areas, but in Pikmin 3 Deluxe, it does. The cursor can only be moved to areas that have been unlocked; the appearance of the globe is different depending on how many areas are available.)
Some additional buttons are present in this menu. A large "To Earlier Day" button in the bottom left returns to the day selection menu when selected. In Pikmin 3 Deluxe, this button can also be reached by pressing Nintendo Switch 上的 B 键 / Nintendo Switch 上的面键底部按键(Joy-Con 面键), and there is also a pop-up to confirm the player's choice. In addition, after rescuing Captain Charlie in Pikmin 3 Deluxe, a new gold button on the bottom of the map labeled "To Assignment" appears. Selecting it takes the player directly to the Side Stories menu. This option remains on every future save file after being unlocked, even before Charlie is saved.
In this menu, the player can press Wii U 手柄上的方向键向上 / Wii 手柄上的减号键 / Nintendo Switch 上的 Y 键 / Nintendo Switch 上的面键左侧按键(Joy-Con 面键) to open a Talk (or Check in) conversation; this causes the camera to zoom out to view the Koppaites talking. This button prompt is shown on-screen. In Pikmin 3 Deluxe, additional button prompts are shown: Nintendo Switch 上的减号键 will open the KopPad (with the area shown on the radar being the current selected area), and Nintendo Switch 上的加号键 will open the pause menu. (In the original Pikmin 3, the KopPad is shown on the GamePad at all times, unless in GamePad-only mode, which will instead have a button in the top-left to open it.)
The menu also displays some additional information. On top of the map is a box in the top left with the name of the selected area, a box on the top right with the current day and amount of juice left, and a box in the bottom right with a slideshow of images of the selected area (the images shown are 3 preset images per area and the last 3 photos taken in that area with the KopPad Camera in the current playthrough) and a numerical display of the fruits collected in the area (and how many fruits there are in the area, if that information has been unlocked).
If a major story event happened on the previous day, the Koppaites will talk about it before the menu can be used. In addition, after Louie is saved for the first time, the menu will be skipped altogether, as Louie lands the ship in the Garden of Hope. When a new area is unlocked, there will also be a cutscene highlighting the new area, and the appearance of the globe will change after that.
Pikmin 4
模板:Infobox menu In 皮克敏 4, there are 3 different area selection menus that can be accessed by talking to different characters in the Rescue Command Post. Each of these menus has the title "Select Area to Explore" at the top of the screen, and each has the same layout, with options on the left side of the screen and information about those options on the right side of the screen. Each of these menus can be closed by pressing Nintendo Switch 上的 B 键 / Nintendo Switch 上的面键底部按键(Joy-Con 面键).
By talking to Collin, the normal area selection menu can be accessed, for exploring an area during the day. The left side of the screen lists the name and percentage of progress in each area, with a flower icon on the left side of the name if the area is 100% completed. Nintendo Switch(Joy-Con)上的左摇杆 / Nintendo Switch(Joy-Con)上的方向键 can be used to change which area is highlighted, and pressing Nintendo Switch 上的 A 键 / Nintendo Switch 上的面键右侧按键(Joy-Con 面键), and then confirming that in a message box, will select the highlighted area. The right side of the screen contains information about the highlighted area, with an image of the area that changes every few seconds, a map that shows the area's location on the world map, the wild Pikmin types in the area, the number of rescues, treasures, and Onions the player has collected in the area, and a comment from Collin. By pressing Nintendo Switch 上的 Y 键 / Nintendo Switch 上的面键左侧按键(Joy-Con 面键), the player can view details of the caves in the area, with all information on the right side of the screen except for the image replaced with a list of caves showing the percentage of progress in each cave and on the surface of the area. If an area has not previously been visited, no images or wild Pikmin types are shown and cave details cannot be viewed.
By talking to Yonny, the area selection menu for night expeditions can be accessed. The left side of the screen lists the name of each area, with a flower icon on the left side of the name if all night expeditions in the area have been successfully completed. Nintendo Switch(Joy-Con)上的左摇杆 / Nintendo Switch(Joy-Con)上的方向键 can be used to change which area is highlighted. Pressing Nintendo Switch 上的 A 键 / Nintendo Switch 上的面键右侧按键(Joy-Con 面键) to select the area will bring up another menu for selecting a base within that area, which contains the name of each base, the danger level of that base's night expedition, and a flower icon if that base's night expedition has been completed. Selecting a base, and then confirming that in a message box, will select that base's night expedition. The right side of the screen for selecting an area contains information about the highlighted area, with an image of the area at night, a map that shows the area's location on the world map, the name of each base that has a night expedition with a flower icon next to the name if that base's night expedition has been completed, and a comment from Yonny. If an area has not previously been visited at night, the image isn't shown.
By talking to Olimar and selecting a day, the area selection menu for Olimar's Shipwreck Tale can be accessed. The left side of the screen lists the name of each area, with a flower icon on the left side of the name if all ship parts in the area have been collected. Above the list, the total number of ship parts collected is shown, and at the bottom of the list there is a "Rewind and Retry" option which returns to the day selection menu. Nintendo Switch(Joy-Con)上的左摇杆 / Nintendo Switch(Joy-Con)上的方向键 can be used to change which area is highlighted, and pressing Nintendo Switch 上的 A 键 / Nintendo Switch 上的面键右侧按键(Joy-Con 面键), and then confirming that in a message box, will select the highlighted area. The right side of the screen shows the number of days left and contains information about the highlighted area, with an image of the area that changes every few seconds, a map that shows the area's location on the world map, the number of ship parts and Onions the player has collected in the area, and a comment from Olimar.
Hey! Pikmin
模板:Infobox menu 模板:Infobox menu 嘿!皮克敏 does not have days, so the area selection menu appears in between levels. It has 2 distinct parts: a sector selection menu for selecting a sector, and an area selection menu for selecting an area within the sector. Each sector has a separate area selection menu, except for The Final Stretch, which only has 1 area and skips the menu as a result.
The sector selection menu shows a globe of the Hey! Pikmin planet on the bottom screen, which can be orbited around by dragging the Nintendo 3DS 触控笔 stylus on the touch screen. Each sector is represented by a large landmass on the planet with a colored outline around it. The sector number is indicated above the landmass in a rounded box in the same color as the outline. Only sectors that are mostly visible from the current viewing angle have their numbers visible. Upon tapping a sector's continent or box, the top screen, which shows a closer view of the planet from a low angle, will quickly pan to show the sector selected, along with its name. Upon tapping the sector again, the area selection menu for that sector will be opened. The top screen also shows the text "Select Sector", the total amount of Sparklium collected, and the number of treasures collected in that sector. The bottom screen has a button to return to the title screen.
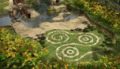
The area selection menu is like a traditional level map. It shows the areas within the sector as large colored bubbles on top of a landscape background on the bottom screen. Each bubble shows which treasures have been collected in the area as small icons which can be grey dots (for an uncollected treasure) or yellow stars (for a collected treasure), and also shows the area's number. Secret Spots are shown on the map as small purple bubbles, and Sparklium Springs are shown as small blue bubbles. Lines of white dots connect the areas, and smaller yellow dots connect the areas to Secret Spots or Sparklium Springs. Tapping a bubble will select it, placing a cursor over it, and tapping it again will confirm it, entering the area. The top screen shows an animated background representing the currently selected area, as well as the currently-selected area's name, and icons of the treasures collected there. The bottom screen has buttons to return to the sector selection menu, view the logs, open the options menu, scan an amiibo, and enter the Pikmin Park. The top screen also shows the text "Select Area", the sector number, and the total amount of Sparklium collected.
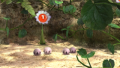
Each sector has a color on the sector selection menu, and a similar color is used for the area bubbles on the area selection menu. The Brilliant Garden is green, the Verdant Waterfront is blue, the Sparkling Labyrinth is purple, the Ravaged Rustworks is yellow, the Leafswirl Lagoon is orange, the Sweltering Parchlands is red, the Snowfall Field is light blue, the Lushlife Murk is pink, and The Final Stretch is dark red.
图库
Pikmin
- Pikmin world map.png
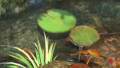
The background of Pikmin's area selection menu.
The preview for The Impact Site.
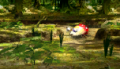
The preview for The Forest of Hope.
The preview for The Forest Navel.
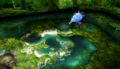
The preview for The Distant Spring.
The preview for The Final Trial.
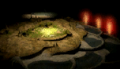
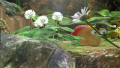
- Sozaijiten06 164.jpg
One of the stock photographs used for area selection menu's main landmass in Pikmin and Pikmin 2.
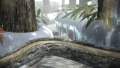
- Sozaijiten06 122.jpg
One of the stock photographs used for area selection menu's distant mountain and sky.


Pikmin 2
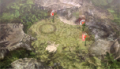
- Pikmin 2 map uncropped.jpg
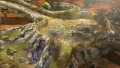
The background of Pikmin 2's area selection menu.
- P2 World Map Stripped.png
The background of the area selection menu without any of the areas' textures.
- P2 World Map Valley Of Repose.png
The Valley of Repose's selection menu texture.
- P2 World Map Awakening Wood.png
The Awakening Wood's selection menu texture.
- P2 World Map Perplexing Pool.png
The Perplexing Pool's selection menu texture.
- P2 World Map Wistful Wild.png
The Wistful Wild's selection menu texture.
Pikmin 3
- Pangaeaultima a.gtx.png
The texture used for the planet on Pikmin 3's area selection menu.
One of the previews for the Tropical Wilds.
One of the previews for the Garden of Hope.
One of the previews for the Distant Tundra.
One of the previews for the Twilight River.
One of the previews for the Formidable Oak.


Pikmin 4
- P4 Area Selection Map Texture.png
The background of Pikmin 4's area selection menu.
- P4 Night Area Selection Map Texture.png
The background of the night expedition area selection menu.
Hey! Pikmin
- Brilliant Garden texture.png
The texture used for the Brilliant Garden's area selection menu.
- Verdant Waterfront texture.png
The texture used for the Verdant Waterfront's area selection menu.
- Sparkling Labyrinth texture.png
The texture used for the Sparkling Labyrinth's area selection menu.
- Ravaged Rustworks texture.png
The texture used for the Ravaged Rustworks' area selection menu.
- Leafswirl Lagoon texture.png
The texture used for the Leafswirl Lagoon's area selection menu.
- Sweltering Parchlands texture.png
The texture used for the Sweltering Parchlands' area selection menu.
- Snowfall Field texture.png
The texture used for the Snowfall Field's area selection menu.
- Lushlife Murk texture.png
The texture used for the Lushlife Murk's area selection menu.
其他信息
- The day counter bubble in Pikmin 2 can only contain 3 digits, so if the current day is greater than 999, it will not display properly.
- In Pikmin模板:'s area selection menu, the name of the currently chosen area displays in front of the S.S. Dolphin and Onions, as seen when the player selects The Distant Spring. However, the day counter, a similar HUD element, displays behind the vessels, as seen when The Final Trial is chosen.
- Pressing Wii 手柄上的减号键 in New Play Control! Pikmin 2模板:'s area selection menu will cause the Wii Remote's speaker to sound a "boing!" sound, same as the one heard when picking an invalid number of Pikmin from the Onion menu.
- In the area selection menu and 2-Player Battle menu of Pikmin and Pikmin 2, it is possible to press the whistle button to abort an area selection, provided the small animated ship or Onions have yet to land.
- Shooting stars occasionally fall in the background of the area selection menu in Pikmin and Pikmin 2. When the final area is being unlocked, several shooting stars in a row appear for some seconds.
- The two source photos used for the main landmass explored in Pikmin and Pikmin 2 and the distant island housing The Final Trial in Pikmin are both located in the Japanese region of Hokkaido, Japan's northernmost and second largest island. The source photo used for the central landmass is of nondescript forests and plains near the east sea of Japan and, and out of view from the photo, the Shakotan River,[1] while the distant island's source photo is of Lake Mashu and Mount Kamui.[2]
- Pikmin 3's area selection menu contains several pieces of Koppaite text.