树海穴眼
阅读
2026-01-30更新
最新编辑:Mr_Biantainne
阅读:
更新日期:2026-01-30
最新编辑:Mr_Biantainne
| 树海穴眼 | |
|---|---|
| |
| 宇宙船零件 | 9 |
| 发现的 皮克敏 | 蓝色皮克敏 |
| 需求 | 取得 5 个 宇宙船零件 |
| 音乐 | 树海穴眼 |


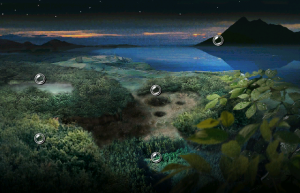
树海穴眼 (樹海のヘソ?,大意为:树海的肚脐)是 皮克敏 中的第三个 区域。它的日语名称是因为它从高空看长得像肚脐[1]。它设置在森林中的一个洞穴中,那里有蜿蜒的小路、沙滩和许多边缘石池。它包含 9 个 宇宙船零件,通过收集 5 个宇宙船零件来解锁。蓝色皮克敏 在这个区域被发现。该区域的 原生生物 反映了其地下性质,有 面包拟态虫、䔁䔁蛙 等。这个区域在 皮克敏 2 中没有被重用,但在 皮克敏 3 中被重制为 任务模式 关卡,即 回忆沙滩。
主要分布

中心是据点,周围环绕着 沛蕾特草 和几个可以获得 大地精华 的地方。西边是 蓝色皮克敏 最初被发现的地方。这部分由几个不同海拔的小水池组成,一直到地图的北面,这些水池基于现实世界的结构,称为边石坝。在它的西边是一条狭窄的小路,上面覆盖着 喷火装置。南边是一片沙滩,在那里可以找到 猪德古利。可以建造一些 桥,以便皮克敏搬运物品回到据点。西南方向有一个大湖,湖里有 䔁䔁蛙。东南方向是一片黑暗区域,有喷火装置和 发光菇,在那里可以找到 呆呆菇。最后,东边是与 球蛛 战斗的圆形场地。
该区域的 炸弹岩 在管道中发现,总共有 25 个。第一根管道位于发现 锿喷射装置 1 的水池旁边。另一个则在 重力跳跃器 所在地的后面,在一片小海滩上。
物品
宇宙船零件
 锿喷射装置 1: This part is located at the bottom of many pools of water.
 重力跳跃器: At the far end of the beach filled with Fiery Blowhogs is a cliff with two bridges on either side. This part is in the middle of the two bridges.
 自动式齿轮: This part is atop a high ledge near where Blue Pikmin are discovered. This cliff is too high for even Yellow Pikmin to be thrown, so they must climb over a climbing stick on an opposite cliff.
 太空飘浮圈: This part is inside of a Breadbug that prowls the area. The nest of the Breadbug is located near the Gravity Jumper.
 抗二恶英: This part is located deep into the water beside the Fiery Blowhog beach. It is guarded by two Wollyhops.
 天秤: In one corner of the Fiery Blowhog beach is a gate. Past the gate and the fire geysers is a bridge, which can be built over the abyss to reach the ledge with the part atop it.
 模拟电脑: Beyond the Libra, past more fire geysers, is a pool of water containing this part.
 欧米茄稳定器: Near the cliff with the Gravity Jumper is a path leading to an arena guarded by mandiblards, a Wollyhop and fire geysers. This part is inside of a Puffstool in the arena.
 防卫卫星: Near the Omega Stabilizer, going up pathways, are several gates: two reinforced, and one regular. Inside one reinforced gate is an arena, inside which is the Beady Long Legs. The Beady Long Legs has the part.
Enemies
 Fiery Blowhog × 6
 Breadbug × 1 (once defeated, it never returns)
 Wollyhop × 4
 Puffstool × 1 (once defeated, it never returns)
- [icon] Honeywisp × 5
 Male Sheargrub × 7
 Shearwig × 11
 Iridescent Flint Beetle × 2
 Beady Long Legs × 1 (once defeated, it never returns)
Obstacles
- [icon] White bramble gate × 1
- [icon] Black bramble gate × 2
- [icon] Gray reinforced wall × 3
- [icon] Black reinforced wall × 2
- [icon] Fire geyser × 10
Tools
Vegetation
- [icon] Pellet Posy × 17 (5 posies near the Blue Onion don't regrow after destroyed, or disappear after 10 days upon discovery)
- [icon] Common Glowcap × 19
- [icon] Candypop Bud (Yellow) × 1
- [icon] Candypop Bud (Red) × 1
- [icon] Nectar weed × 4
Other
- Rubble × 2
Guide
|
以下内容包含指南。 |
After landing, grab some Red and Yellow Pikmin, and head west towards the Blue Onion. Before heading down to the Onion, put all of your Pikmin onto the stick that leads to the Automatic Gear. While your Pikmin collect that part, grow as many Blue Pikmin as possible using the pellet posies. The Breadbug may come and try and steal some of your pellets, to combat this, you must put as many Pikmin on the object as possible and drag the Breadbug to the Onion. This will hurt the bug. If the Breadbug is nearly dead, you can throw Pikmin onto its back and it will take damage, hopefully enough to kill it. Once it has died, it will drop the Space Float. Collect the part and head back to the landing site.
Once you are back, collect all your Pikmin and leave through the east side then head north. You'll see a bramble gate, destroy it and head through. continuing heading north with your Blue Pikmin and follow the path around through the water and you'll come across the #1 Ionium Jet which you should collect. Head back to the landing site and head all the way south. You'll see multiple bridges that should be built and eventually end up up to an open plain with a handful of Fiery Blowhogs. Using Red Pikmin, dispatch of these and head to the left of the body of water to the south. Here you'll find a platform with another part on top of it. Throw some Pikmin up to the bridge and wait for them to build it. Once completed, collect the Gravity Jumper and build the other bridge on the opposite side. This bridge leads to a lot of bombs that you should collect. Head back over the bridges and disband all your Pikmin, excluding Blue, and head into the body of water. Here 2 Wollyhops reside along with the Anti-Dioxin Filter. Kill the frogs and collect the part. While they collect the part, head back and collect the rest of your Pikmin and continue heading east.
You'll end up in a dark area illuminated by Common Glowcaps, and a Puffstool. This is your first mini-boss. Charge all of your Pikmin towards it until it falls over. Whistle you Pikmin and precede to throw them onto it's flailing body until it either dies or throws them off. If it doesn't die, whistle all of your Pikmin so they do not get turned into Mushroom Pikmin. Repeat this until it is defeated. Once dead, it will drop the Omega Stabilizer which you should use Red Pikmin to collect as there are some fire geysers at the exit. Head back to the landing site to collect all of your Pikmin. Swap some Blue Pikmin for Yellow Pikmin as the next mini-boss will be easier with yellows. Head east then south from the landing site until you arrive at a black reinforced wall. Blow this up with 9 bombs and destroy the black bramble gate behind it as well. Behind the bramble gate will be some fire geysers, Shearwigs and another wall. Kill the shearwigs and blow up the wall with 3 bombs. The new area behind the wall is an arena for the Beady Long Legs. The way to beat this mini-boss is to throw Yellow Pikmin onto it's body until it dies. Watch out for it's legs as it will kill Pikmin if they are stepped on. This enemy drops the Guard Satellite which should be collected with Red Pikmin due to the fire geysers.
Head back to the landing site and withdraw/deposit Pikmin until you have 60 Red, 20 Yellow and 20 Blue. From the landing site, head south to the fiery blowhog plain and then head west. Destroy the bramble gate and continue down the path, be careful of the fire geysers. Once you have got about half way down the path, you'll come across a bridge. Put all your Yellow Pikmin on this along with ~20 Red Pikmin. Continue down the path and use your Blue Pikmin to bring the Analog Computer out of the water, then make your Red Pikmin carry it back. Head back to the bridge and wait for it to be finished if not. Once the bridge is built, use Blue Pikmin to open the geyser in the water and throw all your Yellow Pikmin up to the higher ledge. Use the geyser and throw your Yellow Pikmin up to the Libra. When the part has fallen to the lowest level (be careful of the Libra glitch), swap the yellows for reds and wait until they collect the final part.
In Challenge Mode
In Challenge Mode, The Forest Navel may not have many enemies or obstacles, but it does have many pellets spread around a huge area. Exploring the area to visit all the locations in time is the main challenge of the stage. There is a time limit of 16 minutes and 12 seconds to grow a maximum of 482 Pikmin here.
Object breakdown
| Pikmin source | Seeds | Amount | Total |
|---|---|---|---|
| Starting Reds | 5 | 5 | |
| Starting Yellows | 5 | 5 | |
| Starting Blues | 5 | 5 | |
| Red 1 pellets | 2 | 5 | 10 |
| Red 5 pellets | 5 | 4 | 20 |
| Red 10 pellets | 10 | 3 | 30 |
| Red 20 pellets | 20 | 3 | 60 |
| Yellow 1 pellets | 2 | 5 | 10 |
| Yellow 5 pellets | 5 | 6 | 30 |
| Yellow 10 pellets | 10 | 5 | 50 |
| Yellow 20 pellets | 20 | 2 | 40 |
| Blue 1 pellets | 2 | 8 | 16 |
| Blue 5 pellets | 5 | 6 | 30 |
| Blue 10 pellets | 10 | 4 | 40 |
| Blue 20 pellets | 20 | 2 | 40 |
| Pellet Posy | 2 | 2 | 4 |
| Pellet Posy | 2 | 2 | 4 |
| Pellet Posy | 2 | 2 | 4 |
| Pellet Posy | 2 | 8 | 16 |
| Breadbug | 13 | 1 | 13 |
| Pearly Clamclamp | 50 | 1 | 50 |
| Honeywisp | 0 | 4 | 0 |
| Total | 482 | ||
Glitches
模板:Game help There is a rare glitch that can happen in in this level. When the player defeats an enemy (usually the Wollyhop), one or more Pikmin will vanish with no soul shown. When this happens, sometimes the first Pikmin-counter gauge (on the bottom of the screen) will show more than the total number of Pikmin in the area. For example: 98/97/305. The Pikmin gauge should stay like that until sunset. This happens in other areas, but in The Forest Navel it is more common. This glitch can also occur when battling other enemies, and apparently even when there are no enemies around. This glitch can also happen in the Awakening Wood in Pikmin 2.
There is also a glitch that will cause Olimar to fall into the abyss by where the Libra is. In Challenge Mode, there are 3 large pellets in the very back area where the Analog Computer is in story mode. However, the path back to the Onions is too narrow for all 3 pellets to be carried back at once. If Olimar is standing between the pellets while they are being carried, he may get pushed off the edge, along with the pellet and possibly the Pikmin carrying it. Olimar will not die or respawn when he falls into the pit; in fact, he will not even fall at all. Instead, he will "float" over the pit as if there was invisible ground. Olimar can walk very far into the darkness, but it may be hard to tell where he is going, because the screen will not follow him. It's also possible to do it in Story Mode, by attracting Shearwigs to the bridge and having them eat it. To see a video of this glitch, click here.
If Olimar falls into the pit by any other means, he will simply respawn after a few seconds back in the same spot he was before he fell. The only other known way to fall into the abyss is to lure the Shearwigs by the Automatic Gear all the way to the island where the Libra is, which will cause them to start chewing the bridge.
There is a supposed glitch that can cause the Beady Long Legs to escape its arena.
Finally, the Libra glitch can also happen with the namesake ship part.
图库
- NPCP1 03 The Forest Navel Landing.png
Overview of the landing site.
- NPCP1 CM 03 The Forest Navel Landing.png
Overview of the landing site in Challenge Mode.
- TFN start.png
The landing site.
- TFN open.png
An open dirt area next to the landing zone.
- TFN bridge.png
One of the many bridges in the area.
- TFN shearwigs.png
Shearwigs next to the entrance to the Beady Long Legs' arena.
- TFN blowhogs.png
The beach area that has Fiery Blowhogs.
- TFN gravity jumper.png
The location of the Gravity Jumper.
- TFN bottle.png
The large lake, with a 模板:W bottle in it.
- TFN puffstool entrance.png
The entrance to the Puffstool arena.
- TFN puffstool arena.png
Another image of said arena.
- TFN blues entrance.png
The entrance to the location where Blue Pikmin are first found.
- TFN blues.png
The area where the Blue Onion is first found.
- TFN libra entrance.png
The entrance to the path that leads to the Libra and the Analog Computer.
- TFN libra.png
The area with the Libra.
- TFN top.png
The northernmost section of the area, where the Analog Computer can be found.
- TFN BLL.png
The Beady Long Legs' arena.
Preview image on the area selection menu.

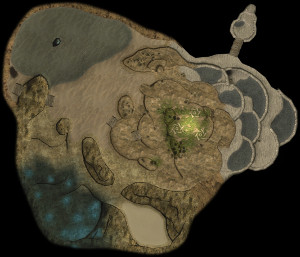
Maps
Aerial view.
- The Forest Navel Player's Guide Map.png
Official map from the Official Nintendo Player's Guide.
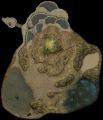
The radar pattern of The Forest Navel.
- The Forest Navel P1S map.png
The radar pattern of The Forest Navel in the Nintendo Switch version of Pikmin 1.
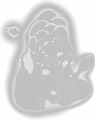
- FCFNCompare.png
A map comparing The Forest Navel to the Forgotten Cove. The Forest Navel is in white.

其他信息
- There is a seemingly useless geyser near the bomb-rock location by the Gravity Jumper. If the player makes the Pikmin activate it and have Olimar use it, it will launch him up far into the air and make him land on the water. This has no relevance to getting any parts, nor does it aid Olimar in any way, meaning it could be an erroneous leftover from an older version of the map.
- The map of The Forest Navel very vaguely resembles a Bulborb or Bulbear. It is unknown whether or not this is intentional.
- All ship parts whose names begin with "A" are in The Forest Navel.
- There is a 模板:W bottle on the lake in this area. Ramune bottles also appear in shapetst, and one bottle is the main focus of the second Pikmin Short Movie, Treasure in a Bottle.
另见
参考资料
- ↑ “With its newly increased functions, the Dolphin now lifts higher into this planet's atmosphere. I see a great depression in the woods beneath me—it looks like a belly button in this vast forest. Now that my ship is more stable, I should be able to set it down there.” – Olimar in his voyage log when unlocking The Forest Navel
| 树海穴眼 | ||||||||||
|---|---|---|---|---|---|---|---|---|---|---|
|
可以点击图片上的物品。 |
| |||||||||
![[icon]](/pikmin/index.php?title=%E7%89%B9%E6%AE%8A:%E4%B8%8A%E4%BC%A0%E6%96%87%E4%BB%B6&wpDestFile=Honeywisp_icon.png)
![[icon]](/pikmin/index.php?title=%E7%89%B9%E6%AE%8A:%E4%B8%8A%E4%BC%A0%E6%96%87%E4%BB%B6&wpDestFile=White_bramble_gate_icon.png)
![[icon]](/pikmin/index.php?title=%E7%89%B9%E6%AE%8A:%E4%B8%8A%E4%BC%A0%E6%96%87%E4%BB%B6&wpDestFile=Black_bramble_gate_icon.png)
![[icon]](/pikmin/index.php?title=%E7%89%B9%E6%AE%8A:%E4%B8%8A%E4%BC%A0%E6%96%87%E4%BB%B6&wpDestFile=Gray_reinforced_wall_P1_icon.png)
![[icon]](/pikmin/index.php?title=%E7%89%B9%E6%AE%8A:%E4%B8%8A%E4%BC%A0%E6%96%87%E4%BB%B6&wpDestFile=Black_reinforced_wall_P1_icon.png)
![[icon]](/pikmin/index.php?title=%E7%89%B9%E6%AE%8A:%E4%B8%8A%E4%BC%A0%E6%96%87%E4%BB%B6&wpDestFile=Fire_geyser_icon.png)
![[icon]](/pikmin/index.php?title=%E7%89%B9%E6%AE%8A:%E4%B8%8A%E4%BC%A0%E6%96%87%E4%BB%B6&wpDestFile=Geyser_icon.png)
![[icon]](/pikmin/index.php?title=%E7%89%B9%E6%AE%8A:%E4%B8%8A%E4%BC%A0%E6%96%87%E4%BB%B6&wpDestFile=Climbing_stick_icon.png)
![[icon]](/pikmin/index.php?title=%E7%89%B9%E6%AE%8A:%E4%B8%8A%E4%BC%A0%E6%96%87%E4%BB%B6&wpDestFile=Bridge_P1_icon.png)
![[icon]](/pikmin/index.php?title=%E7%89%B9%E6%AE%8A:%E4%B8%8A%E4%BC%A0%E6%96%87%E4%BB%B6&wpDestFile=Pellet_Posy_icon.png)
![[icon]](/pikmin/index.php?title=%E7%89%B9%E6%AE%8A:%E4%B8%8A%E4%BC%A0%E6%96%87%E4%BB%B6&wpDestFile=Common_Glowcap_icon.png)
![[icon]](/pikmin/index.php?title=%E7%89%B9%E6%AE%8A:%E4%B8%8A%E4%BC%A0%E6%96%87%E4%BB%B6&wpDestFile=Golden_Candypop_Bud_icon.png)
![[icon]](/pikmin/index.php?title=%E7%89%B9%E6%AE%8A:%E4%B8%8A%E4%BC%A0%E6%96%87%E4%BB%B6&wpDestFile=Crimson_Candypop_Bud_icon.png)
![[icon]](/pikmin/index.php?title=%E7%89%B9%E6%AE%8A:%E4%B8%8A%E4%BC%A0%E6%96%87%E4%BB%B6&wpDestFile=Nectar_weed_icon.png)
![[icon]](/pikmin/index.php?title=%E7%89%B9%E6%AE%8A:%E4%B8%8A%E4%BC%A0%E6%96%87%E4%BB%B6&wpDestFile=Blue_Pikmin_P2_icon.png)
| 皮克敏 区域 |
|---|
 可以点击图片上的区域。
落难地点 • 希望森林 • 树海穴眼 • 大水源 • 最后试炼 animtest • codetest • E3play_3 • map_06 • play_4 • route • shapetst • testmap • tuto1 • tuto2 |