落难地点
阅读
2026-02-13更新
最新编辑:Mr_Biantainne
阅读:
更新日期:2026-02-13
最新编辑:Mr_Biantainne
| 落难地点 | |
|---|---|
| |
| 宇宙船零件 | 2 |
| 发现的 皮克敏 | 红色皮克敏 |
| 需求 | 无 |
| 音乐 | 落难地点 |


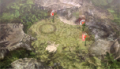
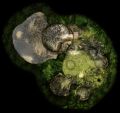
落难地点 (遭難地点?,大意为:落难地点)是 皮克敏 中的第一个 区域。它位于一片林地中,顾名思义,是 宇宙船多露芬号 在游戏开始时迫降的地方,作为教程区域,因为它是 欧力马队长 第一次发现皮克敏的地方。该区域仅包含两个 宇宙船零件,其中一个是在第 1 天收集的。红色皮克敏 在这个区域被发现。该区域包含的原生生物很少。有两个 Boss:米乌林 和 水麻薯 从第 8 天开始,会交替出现。这个区域的地图在 皮克敏 2 中被重制成为 愿望大地 的一部分。
主要分布
该地区拥有一些郁郁葱葱的绿草地形和自然环境,给人一种森林般的氛围。该地区由一个在第一天无法进入的小水池、一些树桩和一些相对较小的草地空地组成。它的尺寸不是很大,因为它主要是为了教玩家游戏如何运作。该区域的各个主要部分非常开放,但它们之间的路径非常狭窄,这有助于将该区域划分为明确的部分。这与区域的线性性质相结合,使其成为一个易于探索的区域。即便如此,它还是设法融入了倾斜的地形和相当多的垂直变化,这有助于玩家了解地面并非一直都是平坦的。
落难地点仅包含两个 宇宙船零件,其中一个是在游戏教程般的开头收集的。第 1 天后,沛蕾特草 增加,一些原生生物开始出现:从那时起大量的 沛蕾特 使该地区可以说是增加皮克敏数量的最佳地点。该区域唯一的 危害 是 水,但在第 1 天无法到达,这阻止了玩家在第 1 天杀死皮克敏。
该地区有两个主要部分:南部是欧力马坠机的草地,北部是长着大树桩的海滩部分。要到达大树桩,玩家必须首先在第 1 天将 纸板箱 推开。需要在 黄色皮克敏 的帮助下炸掉 钢筋墙 才能到达海滩。
从第 8 天开始,靠近水的大树桩成为游戏中 水麻薯 和 米乌林 的唯一出现位置,前者在奇数日出现,后者在偶数日出现。
该地区的每个皮克敏种子来源(沛蕾特,原生生物)每天都会刷新,使该地区成为增加皮克敏数量的最佳地区之一。在落难地点中一天可以繁殖的皮克敏数量最多是 354 只,要求玩家将 3 只 小富虫 全部命中,每只命中 8 次,并且当天 水麻薯 出现。
主要区块
下面将该区域分成数个主要区块来介绍。
坠机区块
这是该地区的据点。地形相当开阔平坦,除了树桩有向上弯曲的小路径,一些无法到达的较高树桩,以及一两个更高的高台,有助于显示 投掷 皮克敏的重要性。这里有一些 沛蕾特草,大树桩上还有每种颜色的 10 号 沛蕾特。在北边,这个区域与主引擎区块相连,但最初被一个 纸板箱 挡住。
主引擎区块
这是容纳 主引擎 的小区块。这个区块的中央有一个坡道,在纸板箱被推开后,可以用来爬上大树桩。在第 1 天后,可以在纸板箱里找到 炸弹岩,可以在 黄色皮克敏 的帮助下摧毁 钢筋墙。
大树桩
这个巨大的开放树桩是玩家与 水麻薯 或 米乌林 战斗的地方。它周围有高墙,只有东面和西面可以离开树桩。东边有坡道通往主引擎区域,西边有一个 钢筋墙 通向池塘。树桩周围的一些地方的高台上有 沛蕾特。
池塘
这部分有一个海滩和一个大池塘。海滩一直向南延伸,穿过一个白色 栅格墙,可以通向坠机区块(这是一条单向路径,因为海滩地势较高)。该区块有三个 山珍珠贝,以及一个红色 20 号 沛蕾特 和一个蓝色 20 号 沛蕾特。其中一只 山珍珠贝 持有 正电子发电机,必须击败它才能获得零件。
物品
宇宙船零件
原生生物
障碍物
Tools
- [icon] Geyser × 1 (needs to be activated)
- [icon] Climbing stick × 1
Vegetation
- [icon] Pellet Posy × 24 (only 3 on day 1)
- [icon] Figwort (small) × 16
- [icon] Figwort (large) × 8
- [icon] Shoot (small) × 1
- [icon] Nectar weed × 2
Guide
|
以下内容包含指南。 |
After gaining control of Captain Olimar, head towards the Red Onion and pluck the newly sprouted Red Pikmin. Using Pikmin, gather all of the pellets, pluck all of the Pikmin, and push the cardboard box. Continue collecting all the pellets on the stump and finish the day by collecting the Main Engine.
Once Blue Pikmin and Yellow Pikmin have been discovered, the final part in this area can be collected. Start by taking some Blue and Yellow Pikmin into the area where the Main Engine was located, and collect at least 3 bomb-rocks from inside the box. Head up the slope to the stump and, using the bomb-rocks, break the white stone wall. Be careful on the stump as the Mamuta or Goolix can spawn depending on what day you are on. Upon entering the pond, head to the farthest left Pearly Clamclamp and use Blue Pikmin to free the Positron Generator. Pikmin must be thrown and whistled in bursts to avoid them being eaten by the Clam. Break the white bramble gate and retrieve the part to complete the area.
In Challenge Mode
The Impact Site is the simplest and shortest Challenge Mode stage, giving the player 10 minutes and 48 seconds to grow up to 278 Pikmin. The area is filled with pellets of all types, and the only enemies are a Breadbug near the Onions and a harmless Iridescent Flint Beetle.
Object breakdown
| Pikmin source | Seeds | Amount | Total |
|---|---|---|---|
| Starting Reds | 3 | 3 | |
| Starting Yellows | 3 | 3 | |
| Starting Blues | 3 | 3 | |
| Red 1 pellets | 2 | 16 | 32 |
| Red 5 pellets | 5 | 2 | 10 |
| Red 10 pellets | 10 | 1 | 10 |
| Red 20 pellets | 20 | 1 | 20 |
| Yellow 1 pellets | 2 | 11 | 22 |
| Yellow 5 pellets | 5 | 4 | 20 |
| Yellow 10 pellets | 10 | 1 | 10 |
| Yellow 20 pellets | 20 | 1 | 20 |
| Blue 1 pellets | 2 | 10 | 20 |
| Blue 5 pellets | 5 | 4 | 20 |
| Blue 10 pellets | 10 | 1 | 10 |
| Blue 20 pellets | 20 | 1 | 20 |
| Pellet Posy | 2 | 2 | 4 |
| Pellet Posy | 2 | 2 | 4 |
| Pellet Posy | 2 | 2 | 4 |
| Pellet Posy | 2 | 8 | 16 |
| Breadbug | 13 | 1 | 13 |
| Iridescent Flint Beetle | 14 | 1 | 14 |
| Total | 278 | ||
图库
- NPCP1 01 The Impact Site Landing.png
Overview of the landing site.
- NPCP1 CM 01 The Impact Site Landing.png
Overview of the landing site in Challenge Mode.
- Pikminlast11.jpg
The Impact Site in Challenge Mode (Japanese version).
- TIS start.png
Olimar right after landing.
- TIS start 2.png
The area around the landing zone.
- TIS flint 1.png
The first Iridescent Flint Beetle in the area.
- TIS flint 2.png
The second Flint Beetle and the location of the bomb-rocks.
- TIS goolix.png
The main tree stump, with a Goolix.
- P1 The Impact Site Pearly Clamclamp Area Entrance.png
The entrance to the watery portion.
- TIS clam.png
The Pearly Clamclamp pond.
- TIS exit.png
Back exit from the pond.
- TIS trunk 1.png
The southernmost tree stump.
- TIS trunk 2.png
The easternmost tree stump.
The preview image on the area selection menu.
- The Impact Site.jpg
Captain Olimar discovers Red Pikmin (prerelease image).

Maps
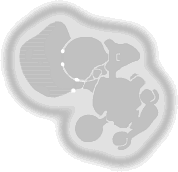
Overview map.
- P1 Impact Site Map.jpg
Map of the area.
- The Impact Site Challenge.png
Fan-made map of the area in Challenge Mode.
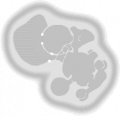
The radar pattern of The Impact Site.
- The Impact Site P1S map.png
The radar pattern of The Impact Site in the Nintendo Switch version of Pikmin 1.
- IS overview.png
An early overview of part of The Impact Site. The textures for this image are loaded in the game itself, but go unused.

其他信息
- A Spotty Bulborb enters Olimar's base during the end of day cutscene, despite there being no Spotty Bulborbs present in the area during daylight hours.
- In the New Play Control! and Nintendo Switch versions, the white bramble gate leading to the beach with the Pearly Clamclamps can be broken down on day 1 by throwing Pikmin onto the ledge as far as possible and getting onto the stump.
- The Impact Site is one of two areas with an optional boss, the other being The Distant Spring.
- The Impact Site's music has inspired multiple tracks in later games:
- Alph's crash site's theme in 皮克敏 3.
- The most common Bingo Battle theme.
- The tutorial stage theme from Pikmin Adventure.
- The music for the Sun-Speckled Terrace in Olimar's Shipwreck Tale.
另见
| 落难地点 | |
|---|---|
|
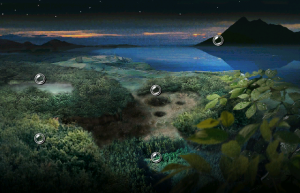
可以点击图片上的物品。 |
|

![[icon]](/pikmin/index.php?title=%E7%89%B9%E6%AE%8A:%E4%B8%8A%E4%BC%A0%E6%96%87%E4%BB%B6&wpDestFile=White_bramble_gate_icon.png)
![[icon]](/pikmin/index.php?title=%E7%89%B9%E6%AE%8A:%E4%B8%8A%E4%BC%A0%E6%96%87%E4%BB%B6&wpDestFile=White_reinforced_wall_P1_icon.png)
![[icon]](/pikmin/index.php?title=%E7%89%B9%E6%AE%8A:%E4%B8%8A%E4%BC%A0%E6%96%87%E4%BB%B6&wpDestFile=Cardboard_box_icon.png)
![[icon]](/pikmin/index.php?title=%E7%89%B9%E6%AE%8A:%E4%B8%8A%E4%BC%A0%E6%96%87%E4%BB%B6&wpDestFile=Water_body_icon.png)
![[icon]](/pikmin/index.php?title=%E7%89%B9%E6%AE%8A:%E4%B8%8A%E4%BC%A0%E6%96%87%E4%BB%B6&wpDestFile=Geyser_icon.png)
![[icon]](/pikmin/index.php?title=%E7%89%B9%E6%AE%8A:%E4%B8%8A%E4%BC%A0%E6%96%87%E4%BB%B6&wpDestFile=Climbing_stick_icon.png)
![[icon]](/pikmin/index.php?title=%E7%89%B9%E6%AE%8A:%E4%B8%8A%E4%BC%A0%E6%96%87%E4%BB%B6&wpDestFile=Pellet_Posy_icon.png)
![[icon]](/pikmin/index.php?title=%E7%89%B9%E6%AE%8A:%E4%B8%8A%E4%BC%A0%E6%96%87%E4%BB%B6&wpDestFile=Figwort_icon.png)
![[icon]](/pikmin/index.php?title=%E7%89%B9%E6%AE%8A:%E4%B8%8A%E4%BC%A0%E6%96%87%E4%BB%B6&wpDestFile=Shoot_icon.png)
![[icon]](/pikmin/index.php?title=%E7%89%B9%E6%AE%8A:%E4%B8%8A%E4%BC%A0%E6%96%87%E4%BB%B6&wpDestFile=Nectar_weed_icon.png)
| 皮克敏 区域 |
|---|
 可以点击图片上的区域。
落难地点 • 希望森林 • 树海穴眼 • 大水源 • 最后试炼 animtest • codetest • E3play_3 • map_06 • play_4 • route • shapetst • testmap • tuto1 • tuto2 |