游客你好,登录后能编辑wiki哦!
铁路
阅读
2020-08-18更新
最新编辑:逗比的马老师
阅读:
更新日期:2020-08-18
最新编辑:逗比的马老师
- 有关研究,请参阅 Railway (research)
铁路 是Factorio中的主要运输方式之一。 尽管铁路网络的布置可能很复杂,并且需要大量的资源和空间,但它比 传送带 和 机器人物流,尤其是在远距离方面更加高效。
然而,铁路建设并不容易被理解。 需要一些时间来学习基础知识,例如自动化运输。 学习如何管理和维护较大的火车网络需要时间和经验。
基础设施
要建造一条铁路,必须建造铁轨,以使火车行驶。 通常,这是通过rail planner完成的,但也可以手动完成。 请记住,铁轨放置在两格网格上,因此铁轨不能仅由一个砖块移动。
Minimum manually operated railway
As a minimum a manually operated railway has to consist of:
- Rails (tracks)
- Locomotives
Locomotives can be entered and then manually operated by standing next to them and pressing the 回车键 button.
Switches
- There is no visual representation of a working switch, however the rails will appear to merge. Using the rail planner, the player must place a rail overlapping an existing rail to form a switch. Switches are forks in tracks that allow a train to pick between two directional options.
- The crossing of two straight tracks is not usable as switch, as trains have a limited turning radius. They do, however, connect signal blocks which helps prevent collisions.
- Parallel tracks do not interact with each other. However, switching from one track to the other can require extra resources if they are too close together; the track must turn away from the other parallel track and then turn back to it. This can create complicated networks of signals and, as such, one should generally not build parallel tracks unless they are spaced adequately. (Generally, 2 track widths apart works well)
Crossing tracks
Be careful when crossing tracks! Trains are one of the highest damaging entities in the game, and will kill most players instantly on contact.
A checklist of proper track crossing etiquette:
- Zoom out, so that you can see a train coming.
- Look left, then right.
- Check for signals nearby: If a rail signal suddenly jumps from green to red or green to yellow, a train is coming. Do not cross.
- Avoid walking near the tracks, as you do not need to be fully on the tracks to get hit.
- While it is possible to get into/out of a train while it is moving, a miss can cost your life. The sides of the train can still deal damage, as well as the player being able to slip between two rail cars.
- Heavy shields can be used to reduce the damage taken. In extreme cases, it is possible to stop a train with your body. This will require several shield modules to not be instantly killed, and will drain a large amount of the suit's energy.
- All entities with health will take damage getting hit by a train, so take care not to leave a car or tank on the tracks. However, this includes hostile forces!
- Trains far from a train stop will be traveling at (near) max speed, so take extra precaution when crossing and zoom out further. Trains near a train stop or signal will slow down to stop, and will be traveling slower. Trains of different configurations will also move slower or faster.
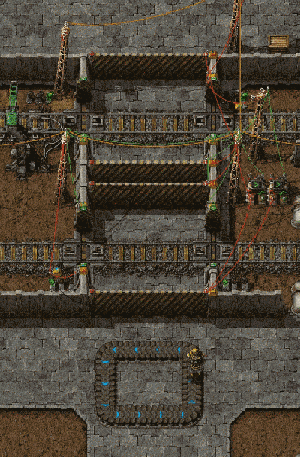
A safe railroad crossing like the example shown in the picture can be built. This works by restricting access to the tracks when an oncoming train has the rails reserved. When the player is on the rails, the signals are reserved by the circuit network, and the train must stop and wait until the player leaves the tracks. When a player is inside the area crossing the tracks, the train gates are closed so the player can't get on the tracks outside the crossing. This is to completely ensure a safe crossing, and is often used on servers.
Trains
Train components:
| 内燃机车 | 货运车厢 | 液罐车厢 | 重炮车厢 |

- A train consists of at least one locomotive.
- Trains can have more than one locomotive, and any number of wagons.
- Locomotives can be manually driven forwards or backwards, however, they are generally slower going backwards. The left and right movement keys are used to change direction at switches.
- Trains can only drive forwards automatically. An automatic train can drive forwards and backwards when two locomotives facing different directions are connected to the train.
- A train needs fuel to drive. Fuel can be added by inserters when the train is in manual mode or parked at a station, not when waiting at a signal or standing on automatic mode.
The locomotives' inventory is only used for fuel. To transport items or fluids cargo wagons and/or fluid wagons have to be attached to the train. To attach rolling stock, whether a wagon or a locomotive, the player may either prepare to place one near an existing train, where a green graphic will show the player that the stock will be attached, showing a connection between the train and the new stock. Alternatively, the player may manually connect rolling stock to trains with the rolling stock connect key, if the cargo wagon was placed far away from a train. Rolling stock can likewise be disconnected with the rolling stock disconnect key.
Stations
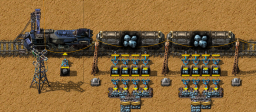
Train stations are the only place where trains can be loaded or unloaded when they are in automatic mode. Cargo wagons can be filled or emptied by up to twelve adjacent inserters (six on each side). Inserters can also be used to insert fuel into locomotives. Pumps are used to transfer fluid into and out of fluid wagons, only three pumps can attach to one fluid wagon at once.
Train stations are usually created by placing a train stop, however it is also possible to create a temporary train station by opening a locomotive's GUI and using CTRL + 鼠标左键 near a rail on the map. This will create a station without requiring a train stop. The temporary train station has a default wait condition of 5 seconds and is removed from the schedule once the train leaves the station.
Signals
| 常规铁路信号 | 联锁铁路信号 |
Rail signals are used to employ multiple trains automatically without the danger of trains crashing into each other. Rail signals split the network into blocks and ensure that only one train can be in every block at any time. Note that driving a train manually ignores all signals; so it is possible for automatic trains to crash into the player if the player ignores red/yellow signals. Always beware of automatic trains and give them the right of way.
The train signals tutorial contains an in-depth explanation of rail signals, blocks and deadlocks.
Basic signaling rules
- There can only be one train in a block at any time. A train spanning multiple blocks occupies them all.
- A red signal means that the following block is occupied by a train.
- A yellow signal means that a train is approaching and already has the approval to enter the following block.
- Rail signals separate a new block and reflect its state: green - free, yellow - reserved, red - occupied
- Rail chain signals separate a new block and reflect the state of the next rail signal(s): see above, blue - at least one of the paths is blocked, but not all
- A train can only pass a signal on the right of the track, or if there is a signal on both sides on the same rail segment. Of course, manual driving overrides this.
Automated transport
Trains set on "Automatic" choose their destination stop and route on departure, and after waiting at a chain signal for five seconds, and when their destination stop disables itself by circuit condition. They choose the shortest route using a path finding algorithm that will get them to an enabled train stop with the right name, taking penalties for any apparent-at-the-time delays into account. If no such train stop exists they will skip the stop and go on to the next.
This section covers items used to make trains automatically transport items between stations. The player should be familiar with creating a rail system.
First, the player has to setup a rail system with at least two train stops, which are placed in the right-hand side of the expected train arrival direction. By hovering over the train stop with the mouse you see the positions of the vehicles for better setting up the train station (including (un)loading machinery, refueling/repair installations).
When you set up the train schedule (see below) and fuel the train, you can start the train on it's schedule by switching from manual to automatic driving mode.
Train schedule
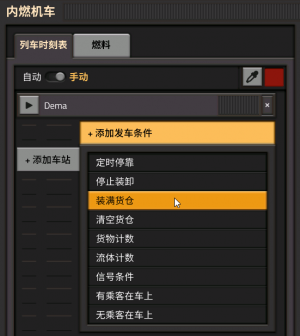
The player can set up a list of train stations in the left locomotive's GUI. The train will route to stops in the given order, if it's at the end it will continue with the first. Stations can be added by clicking "Add station" in the GUI. A pop-up appears with a list of all stop names. If one is selected, another button appears which allows select a wait condition from a pop-up list. Furthermore, the map in the right part of the GUI can be used to add stations to the schedule by using SHIFT + 鼠标左键 on a station or using CTRL + 鼠标左键 near a rail in the map to create a temporary train station.
Wait conditions are used to tell the train when to leave the station. There are 7 types of wait conditions:
- Time passed
- Inventory full – All inventories of the train are full. Does not include fuel inventories.
- Inventory empty – Same as above, but empty. Does not include fuel inventories.
- Item count – The train (all cargoes summed) contains a specific amount of a certain item. Does not include fuel inventories.
- Circuit condition – The train stop is connectable to the circuit network, so the signals can used for wait conditions.
- Inactivity – No items were added or removed for the specified amount of seconds.
- Fluid count – The train (all fluid wagons summed) contains a specific amount of a certain fluid.
- Passenger present - At least one player is inside any part of the train.
- Passenger not present - No players are inside any part of the train.
It is also possible to set no wait condition, this causes the train to simply pass by the station without stopping.
Hereafter the word "term" is used to describe one type of wait condition, and the words "wait condition" are used to describe the whole set of terms (it turns a bit into maths).
If more than one term is added, it is possible to change the connection of those using the logical operators AND and OR. An AND condition will result in true if all terms are true. An OR condition will return true if at least one of the terms is true.
When mixing AND and OR terms, the logic is grouped by the OR terms. When evaluating the wait condition, the first term is evaluated along with all AND terms immediately following up to but excluding the next occurring OR term. If they all evaluate true, the wait condition evaluates true. Otherwise, evaluation continues with that next occurring OR term and all AND terms immediately following it, up to the next OR term. This continues until either an OR group evaluates true and the wait condition is satisfied, or all terms have been checked.
Examples
Expand for examples
Wait until full, up to 30 seconds:
Full cargo inventory
OR 30 seconds passed
Wait until cargo full, or circuit condition Oil > 3000:
Full cargo inventory
OR Circuit condition - Oil > 3000
Wait until empty, and 30 seconds passed, and 5 seconds of inactivity:
Empty cargo inventory
AND 30 seconds passed
AND 5 seconds of inactivity
Wait until iron ore is low, or copper ore is low and at least 30 seconds passed:
Cargo: Iron ore < 500
AND 30 seconds passed
OR Cargo: Copper ore < 500
AND 30 seconds passed
Factorio's wait condition logic is read as disjunctive normal form (DNF), and so this last example is processed as (note the parenthesis):
((Cargo: Iron ore < 500 AND 30 seconds passed) OR (Cargo: Copper ore < 500 AND 30 seconds passed))
Which is the same as this:
((Cargo: Iron ore < 500 OR Cargo: Copper ore < 500) AND 30 seconds passed)
Unfortunately, there is no way to write that shorter form in the current UI.
Troubleshooting
Below are some things to verify if a rail system or train is not working.
- Is the train fueled? Ensure that the locomotive has fuel of some kind.
- Misplaced or non-functional switches? Ensure that the train can plan a path through the switches.
- Another train on the same block? Make sure the path of the train is unobstructed.
- Train stops placed correctly? Make sure that the yellow arrows when hovering on the stop point towards the end or exit of the stop.
- Is the train allowed to enter signals from the right direction? Are the signals set correctly?
- If a track is supposed to be two-way, the rail signals should be opposite each other. You can verify they match up by hovering the cursor over one. For a matched pair, it will show the other.
No path
When trains cannot reach the target, a "no path" symbol pops up over the locomotive. Check:
- Can the train reach its current destination by only driving forward? Build turning slopes or place a locomotive at both ends of a train!
- Are the train stops standing in the right direction? Train stops must be on the right hand side of the track.
- If you use rail signals, check that the signals are all allowing traffic in the correct direction.
- Check for interruptions in the train tracks, drive to the station manually to check there are no rail parts missing. Especially near junctions these can be hard to spot if missing.
If you are still having problems, consider:
- Driving the train manually, and as you pass each switch, try switching to automatic. When it works, you will know the rough area of the problem.
A pictorial summary of typical problems.
相关成就

|
一条道跑到黑 |
Connection to OpenTTD
Factorio's railway system offers the same type of advanced railway design as block entry pre-signals and block exit pre-signals do in Open Transport Tycoon Deluxe.


 沪公网安备 31011002002714 号